Monday, May 14, 2018

WBS and the display of Sales (Procurement) Category

By default the lines created on the WBS are of 'Hour' type. They are displayed on the 'Schedule planning' tab. However if you wish to define and plan for other project transaction types like, 'Expense', 'Item' and 'Fee', you need to navigate to the 'Estimated costs and revenue' tab. 'Hour', 'Expense' and 'Fee' type transactions are ok to define as you need to select an appropriate project category against the same.

However when it comes to items, it is still ok, if you have 'Items' defined, as there is an 'Item number' drop down to select the appropriate item. But if you only deal in procurement categories, then there is a bit of an issue. I mean an additional setup is required, so that procurement categories start showing in the WBS in the 'Sales category' drop down.

Procurement categories on WBS
To allow this to display the additional setup is as follows. The assumption here is a 'Procurement' type category hierarchy is already defined. This can be checked at :

Category hierarchies

Then the next step is to create a new 'Category hierarchy role association' of type 'Sales category hierarchy' and associate it with the 'Procurement' category hierarchy. The navigation to the 'Category hierarchy role association' is as mentioned in the screenshot above.


This setup will enable the display and selection of the procurement category in the WBS.

Thanks
Sarang


Tuesday, February 13, 2018

Calculation Method and Revenue Posting

Calculation Method = None

Project Cost center = A

Contract Value = 100,000
Hours Forecast = 10,000

Total Cost Posted = 7,000
Cost for employee ABS which belongs to Cost Center A = 3000
Cost for employee XYZ which belongs to Cost Center B = 4000

% cost complete = 70% (7000/10,000)
Revenue to recognize = 70,000

Note: In this method, the sales price / amount that is displayed against the posted transaction, is calculated based on sales price setup. This sales price / amount is a tentative indication of what revenue could have been generated from that project transaction. But that is not the actual sales revenue, as the sales revenue in the fixed priced project is through the on-account invoicing (contract value). The entire revenue is recognized on separate 'estimate' fee category (from the project group setup), whenever the revenue recognition is run via the estimate process. System will post the general ledger voucher for the recognized revenue.

Drawbacks:
  1. Entire Revenue of 70,000 is posted to cost center A, as revenue posted in this method follows the dimensions of project.
  2. Revenue per employee is not visible at the transaction level.

Calculation Method = Markup percent – total

Project Cost center = A

Contract Value = 100,000
Hours Forecast = 10,000

Total Cost Posted = 7,000
Cost for employee ABS which belongs to Cost Center A = 3000
Cost for employee XYZ which belongs to Cost Center B = 4000

% cost complete = 70% (7000/10,000)
Revenue to recognise = 70,000
Revenue posted to cost center A = 30,000
Revenue posted to cost center B = 40,000

Note: In this method, the sales price / amount that is displayed against the posted transaction, is calculated based on sales price setup. This sales price / amount is a tentative indication of what revenue could have beeen generated from that project transaction. But that is not the actual sales revenue, as the sales revenue in the fixed priced project is through the on-account invoicing (contract value). Whenever the estimate process is run to recognize the revenue, instead of posting the entire revenue on a fee category (as done in the 'Calculation method = None' process above), system will update the sale value on the individual project transactions posted earlier and will also create a general ledger voucher for the pro-rated recognized revenue per project transaction.

Advantages:
  1. Revenue of 70,000 is posted to cost center A and B on a pro-rata basis. The revenue posted in this method follows the dimensions of individual transaction.
  2. Revenue per employee is visible at the transaction level.
Thanks
Sarang

Wednesday, February 7, 2018

Max Hours Calendar and Maximum Working Time

When the resource is setup for timesheets, he is assigned the 'Period Code' and a 'Max Hours Calendar', however 'Max Hours Calendar' is not mandatory.

In 'Max Hours Calendar' a calendar is selected which has hours specified for the weekdays. Mostly the value is 8 hours per day.

If the 'Max Hours Calendar' is defined on the 'Resource setup' form, then the system restricts the user from entering more hours on the timesheet than specified in the 'Max Hours Calendar'.

If the 'Max Hours Calendar' is NOT defined on the 'Resource setup' form, then the system DOES NOT restrict the user from entering more hours on the timesheet than specified in the 'Max Hours Calendar'.


However if the 'Max Hours Calendar' is defined on the 'Resource setup' form but the situation is such that max hours needs to be overridden for some days, then the user can make use of 'Maximum working time' and specify the values there.In this case system will always take the values from the 'Maximum working time' and not from the 'Max Hours Calendar'. In this case the system restricts the user from entering more hours on the timesheet than specified in the 'Maximum working time' for the days specified.


One small note about the 'Resource scheduling calendar' : The calendar selected here also updates / selects / changes the calendar selected in the 'Calendar' field in the 'Employment' tab of the employee.


The calendar selected in the 'Calendar' field in the 'Employment' tab of the employee is used for ELR.


Thanks
Sarang


Sunday, January 7, 2018

VLOOKUP - Quick Reference

Today i was using VLOOKUP after long (as was involved in Data Migration validation) and i kind of struggled a bit initially. It is straightforward once you know it, but if you have forgotten the mechanism and the logic behind it, it takes a few, not much, but a few iterations to get it right. The purpose of this quick reference blog post is to stop wasting the time in re-inventing the feature in future, if i not use it for long again. This is typical right, once you stop using what you have learnt, your brain tend to either delete it from your memory or keep it somewhere else in the memory, so that it can focus on the recent learning or tend to focus on what matters you most.

I am going to write this post in the language that i would understand once i refer to it in future.

VLOOKUP is simply finding a corresponding value for a desired constant, from a stack of huge data. For example, there may be a excel sheet with 10,000 rows and 19 columns. You know that 1st column is the list of employee id and all the other columns could have different set of data like, salary, leaves, role, employee name, project allocation, reporting manager and years of experience etc. 

Now if someone asks you to prepare a report for 2000 random employees out of 10,000 and they wish to include values from some random 8 columns out of 19, then there are potentially two ways to do it. Either manually search for each and every employee and then search for the corresponding values in the respective columns and then create the report, which is tedious and time consuming or simply use VLOOUP feature. 

Before using VLOOKUP, we shall first look at the contents of VLOOKUP.

VLOOKUP(lookup_value, table array, col_index_num, [range_lookup])

In our example, we will create a new excel sheet with first column being the employee ID (with employee IDs populated) and then the 18 columns for which we require the data. The next 18 columns is where we will be applying the VLOOKUP.

For example the first column is employee id and the first value in the employee ID column is 001 and is in cell A1.

Assume that we wish to find the employee name in the second column.We will apply the VLOOKUP in the second column i.e. Employee name .

The formula will be as follows:

VLOOKUP(A1, table array, col_index_num, [range_lookup])

lookup_value - will be the cell reference of the cell in which employee ID '001' resides, in the new result / report sheet.

table array - is the source of data where you are trying to find the corresponding value ( Employee name, in this case). In our case it will be the entire source sheet with 10,000 rows and 19 columns.

col_index_num - This is the most important parameter. This value is the COLUMN NUMBER from the SOURCE SHEET, where the desired values resides (desired value in this case is Employee name).

For example in the source sheet (with 10,000 rows and 19 columns), the first column is Employee ID and the employee name column is 12, counting from Employee ID, then the col_index_num value will be 12. This will tell the system to fetch the corresponding value from column 12 from the source sheet.

[range_lookup] - This value is either 0 (False, Exact match) or 1 (True, Approximate match). We will mostly (99% of the time) select 0, as hardly we will be interested in approximate value.

But to explain this in more detail, please look at the example below:

In the screenshot below, we are trying to find the value for '2'. However '2' is not present in source data. In this case, if the  [range_lookup] value is '0' .i.e. Exact match (False), then the system displays an '#N/A' error.

[range_lookup] value is '0'col_index_num value = '3' (as 'L' is 3 columns away from 'J')
No 'EXACT' value for '2' hence error is displayed '#N/A'

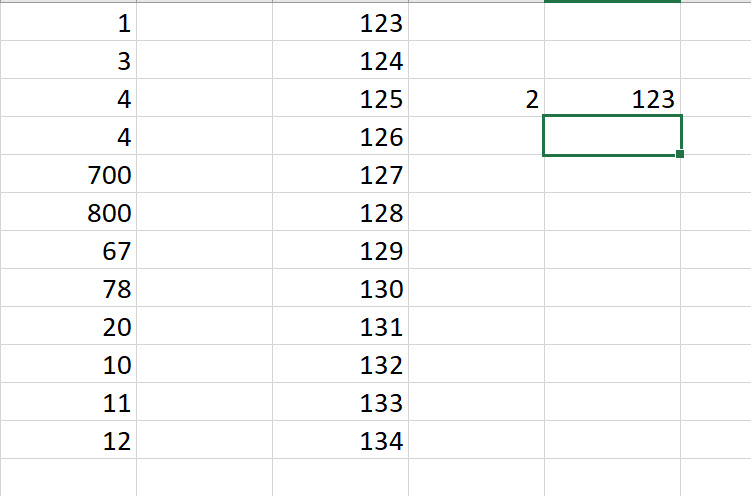
Now if the [range_lookup] value is changed to '1', the system will return the next largest value, that is less than your specific lookup value. In this case it is '123'.

[range_lookup] value is '1'col_index_num value = '3' (as 'L' is 3 columns away from 'J')
No 'APPROXIMATE' value for '2' is found, hence largest value less than to the corresponding look up value (which is value against '1' in this case) is displayed, which is '123'


This is quick reference for VLOOKUP, for me. Hope i will not have to use this post again to remind me of VLOOKUP. But if at all i had to, this post should help me refresh the learning and i should hopefully spend less time reinventing this functionality in future.

Thanks
Sarang

Wednesday, December 13, 2017

Reverting the transaction status from 'Selected for credit note' back to 'Invoiced'

I just now came to know a way of reverting the SAME project transaction which is in 'Selected for credit note' back to 'Invoiced'.
When the project transaction is invoiced, the 'Transaction status' is changed to 'Invoiced':

When you select the transaction for credit note, the 'Transaction status' is changed to 'Selected for credit note'


I was wondering how do i put this 'Transaction status' back to 'Invoiced' as i selected the transaction mistakenly for credit note.
I got to know this today from one of my colleague. The solution is to just run the process again and 'Deselect' the transaction, which will revert the 'Transaction status' from 'Selected for credit note' to 'Invoiced'.
When clicked 'Ok', the system reverts the 'Transaction status' from 'Selected for credit note' back to 'Invoiced'.
The reason for knowing this was, i was getting stuck while posting an estimate on a % complete fixed price project. The on-account transaction based on which system calculates the accrued revenue was in the 'Selected for credit note' state and hence system was giving the error :
"On account cannot be chosen for type project and ID"
Had i known this process of reverting the transaction status back to 'Invoiced' i would have been successful in posting the estimate.

Thanks 
Kind Regards
Sarang

Thursday, November 30, 2017

Two IMP things to remember before a presentation - from posting perspective

The reason to write this post is to take a not of a major disaster i faced while i was presenting the solution to bunch of individuals, who were supposed to test it later and ingrain that learning so that i never forget again.


Batch transfer rules


This small setting can take your presentation to an all together different disastrous path. I had my presentation planned in the afternoon and i tested the complex custom-built functionality since morning, thrice and it all worked perfect, the way it should. The postings were correct, the vouchers were correct, the accounting was correct. I tested the entire end-to-end process and i was so convinced that i would rock the presentation as i was confident about everything and i believed that i really have understood the process and i can deliver the same with that passion and energy. I started my presentation confidently and the moment i posted the first (expense) transaction, i just clicked on the voucher to show the users which accounts are debited and credited. When i clicked on the voucher, it was blank and i was so surprised and sad to see that. The functionality which was working 10 mins back, which i did test (and not once) since morning, what happened suddenly, i could not believe. But as i had previously posted transactions i continued. However i was depressed and my entire presentation was then carried out in a "not so good" manner, though i tried to save the situation by showing previously posted transactions, along with some wit and humor.

After the presentation was over, whilst we were technically trying to find out what must have gone wrong, the technical consultant, finally found out the cause. He said that within those 10 mins before presentation, someone changed the setting of the "Batch transfer rules" from SYNCHRONOUS to SCHEDULED BATCH. I knew this setting but i completely forgot when the fiasco happened in front of the audience. The biggest learning for me, from this incident is, always have a plan B ready, you never know what could go wrong, even if everything is tested and all is working before the presentation. Second most important thing which now i have made a mental note is, to always check for this parameter FIRST whenever i will not see a voucher for a posted transaction in future.

Posting Profile setup in parameters

I mostly work on the projects side of things in the application, hence sometimes you tend not to remember the settings in the other modules. And when that happens then you waste lot of time and energy investigating the issue related to that. "Posting Profile setup in parameters" is kind of basic setting for the people working in the 'Trade and logistics' space, but because projects span across many modules in AX and because you tend to focus more on the settings in that area, you need to forget this sometimes. Also because these settings are mostly done by other team, hence you tend to assume that the settings are in place and this then leads you to forget those settings. Enough of introduction now.

The customer and supplier posting profiles were all in place, with all the necessary accounts etc. even after that when i was processing the supplier invoice, i was getting this error:

"The transactions on the voucher XXXX do not balance as per . (accounting currency: $ - reporting currency: $ "

People working in AX domain will know that something is wrong either with posting profile or with exchange rate. I checked both (supplier posting profile) and all looked fine. The only thing i did not check was whether that same posting profile is configured / called in the parameters. Once that was done, the error was gone and it was all good. The learning for me this was, that not only to check the posting profiles but also to check whether they are called from the respective parameters.


The reason to write these trivial things down was to avoid re-inventing the wheel in future, if at all, i face another memory loss with respect to these settings and errors. :-)

Thanks
Sarang


Sunday, October 22, 2017

Accounting distributions VERSUS Source document

I have summarized the system behavior for "Accounting distributions" and "Source document" parameter setting in General Ledger module in the form of an excel table, for easy understanding and future reference. The example below is to explain the dimension initialization on the vendor invoice, with respect to the setting and its impact on the postings done to the general ledger.

Account distributions - The posting to the summary (Accounts Payable aka AP in this case) will always take the dimension from the Purchase order lines.

Source document -  The posting to the summary (Accounts Payable aka AP in this case) will always take the dimension from the Purchase order header, which is initialized on the Purchase order, from the Vendor master (hence the parameter name is called 'Source document') and which can be changed on the Purchase order header .


Thanks
Sarang